Great photos are one of the most important things to get right if you sell online.
Your photographs are your virtual shop window: If they are not light, bright and eye-catching then often buyers will surf right past your store without even noticing your work.
Really beautiful photographs will bring buyers through your virtual door and keep them there long enough to remember your creations.
These photography tips are designed to help you make your photographs look bright, eye catching and professional and you don't need to have an expensive camera to do this!
This tutorial comes in two parts: 1) How to make a Lightbox and 2) How to edit your photos to make them pop! I use both processes for all of my photographs.
Part 1: How To Make A Lightbox
These tips are one way of taking great photos, but they are certainly not the only way. I hope that you will be able to use this tutorial as a starting point and gain the confidence to make photographs with your own style.
First select a box that is the right size for what you want to photograph. For small items like jewelery a box about 30cm wide or 1 foot is good, although if you want to photograph larger items you will need a larger box.
|
|
Cut out the top of the box and the front, leaving a bar across the top to help your box keep it's shape.
|
|
Line your box with white paper, making a curve with paper in the back horizontal corner so that it won't show up in your background.
|
|
Make sure you put white paper on the sides too, this will help to bounce the light around even more and make your photographs really bright.
|
|
To avoid any lines in your photographs, use a large piece of paper for your backdrop, I love to have a white background so I am using a piece of A3 white card, but you can use any color you like. You can also use fabric if you prefer.
|
|
Stick or pin your background in place, again making a curve in the horizontal corner.
|
|
Your light source should be 2 adjustable lamps with daylight light bulbs, 100watts will get a great result. Daylight light bulbs are best because the colors in your photographs will be more accurate than if you use a regular yellowish bulb.
Daylight light bulbs look bluish when they are not on. You can get daylight light bulbs from any good electrical store, some art supply stores also stock them as painters prefer to use them too.
|
|
Arrange your lamps on either side of your light box, if the stands poke under your box -as they do in mine - then stand your box on some books to make it flat. Some people prefer to just use one lamp, but I find using 2 will eliminate all shadows and shows up the details on your work much better.
|
|
As you can see, when the bulbs are on the light bounces around in the box in all directions! Perfect for taking bright photographs.
|
|
If you have a tripod for your camera then set it up in front of your light box, if you don't have a tripod then add one to your Christmas list! For now you can stand your camera on something to balance it.
|
|
The reason for the tripod is that you don't want to be using the flash on your camera. If you turn off the flash on some cameras then any photographs taken with the camera in your hands will look shaky, the tripod will keep it stable and make your photos nice and clear.
|
|
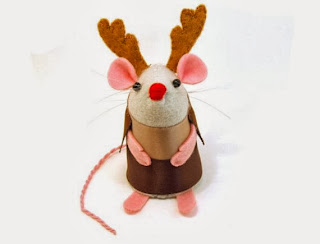
Finally your light box is ready! Place your items in your light box, switch on your lamps, arrange your camera (remember to switch off your flash) and take some photographs!
Every camera is different, some of you may find that you are happy with the photos you get just from the light box. But if you are like me you will still want to make them brighter.
Part 2 explains how to do this...
Join me next time !
PRESENTED TO YOU BY OUR LOVELY LEADER:
|
|
My name is Anna Gilhespy. I have been a successful seller on Etsy for 6 years. My passion is helping other Etsy sellers achieve success with their shops by sharing my experience and knowledge about what works (and what doesn't) with everything Etsy. I have a particular interest in social media marketing and helping small businesses stand on their own two feet.
|


Photography is so important! I grew by leaps and bounds in my photography earlier this year. i even made a lite box and it has really helped me. It's not as nice and neat as yours though.
ReplyDeleteOne thing that also made a HUGE difference was learning a little about white balance. You don't mention it, but I wondered if you'll cover it in another article?
Since I improved my photos and re-shot 90%of my shop, I've gotten picked up for lots of treasuries. It's the same jewelry, but it looks a lot better!
Thanks for sharing and I look forward to your editing piece.
Diana